There are 2 ways you can set up ecommerce tracking with ClientConscious and one of them is to add an ecommerce configuration through GTM. What you need to do in short is to specify CSS selectors for your items that are displayed on the page and ClientConscious will take care of the rest like creating view select and cart events and forwarding them to all tracking platforms.
This approach can be beneficial if you do not have access to your website template, you do not want to modify it, you want your settings to be always accessible and you want to be able to handle them from GTM or you want to your ecommerce markup to be independent from the HTML markup. The prerequisite is that you need to be comfortable with specifying CSS selectors.
If you don’t have the time or developer resources to create this setup we are happy to create it on your behalf. Please contact us for an offer so that we can create an ecommerce setup without the need to touch any code on your website.
Native naming conventions
All platofrms will receive events with their native naming converntions, meaning add to cart will be add_to_cart for Google but AddToCart for Meta. The same holds true for item attributes. Google expects item_id, while Meta uses simply id. This difference in naming convention is taken into account and conversion happens automatically under the hood for all participating platforms. We do our best to provide the platforms all data that they expect to receive. While we do not submit a total item count into Google with the shopping cart ( since this number is computed from the count of separate items there ) we do add a num_items attribute to the Meta payload, which is a standard attribute there. We are always trying to pass all possible information to built-in AI to enable it to work to it’s fullest potential.
Specifying ecom options
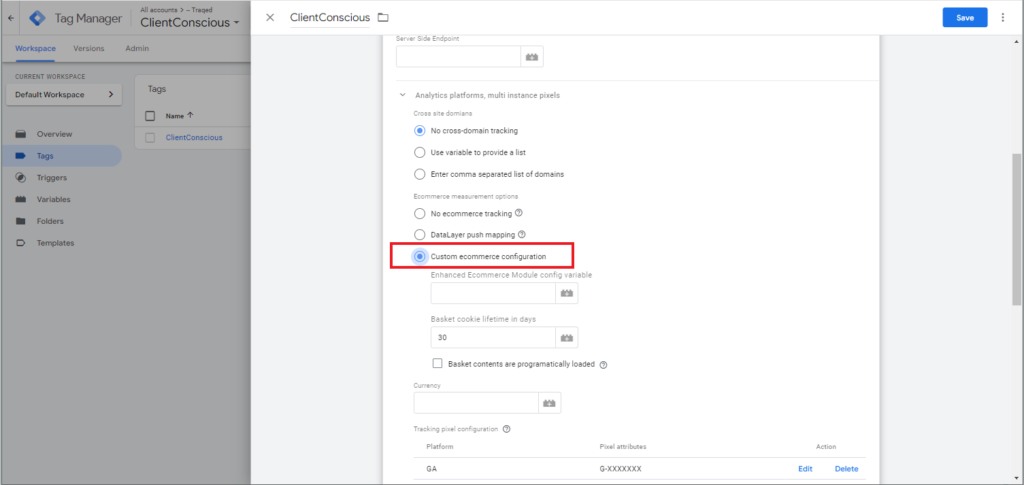
First you need to select “Custom ecommerce configuration” under “Ecommerce measurement options” in your ClientConscious tag for ecom options to be visible.
A couple options will become available when you select this.
Proceeding from bottom up the first one is “Currency”. As the name suggests you can insert the currency code for the currency that is being utilized on your website in here.
Second option from the bottom is “Basket cookie lifetime days”. ClientConscious will remember what the user has put in his / her shopping cart for a set number of days and then it will delete basket contents. You can specify how many days basket contents should be remembered before deletion with this setting. An integer is expected here: the number of days to hold the basket contents in a cookie.
“Basket contents are programatically loaded” checkbox option should be ticked if you are willing to use the API interface to submit the latest basket contents for view cart and checkout events instead of relying on ClientConscious to remember cart contents on your behalf. As cookies might at any time be deleted, or there might be a time difference between your website and ClientConscious getting rid of cart contents, or the user simply could have started adding items into his basket long ago, when you did not use ClientConsciois, this option might be the one you should be going for if you want to account for these smaller nuances and you have the necessary developer resources.
Adding an ecom configuration
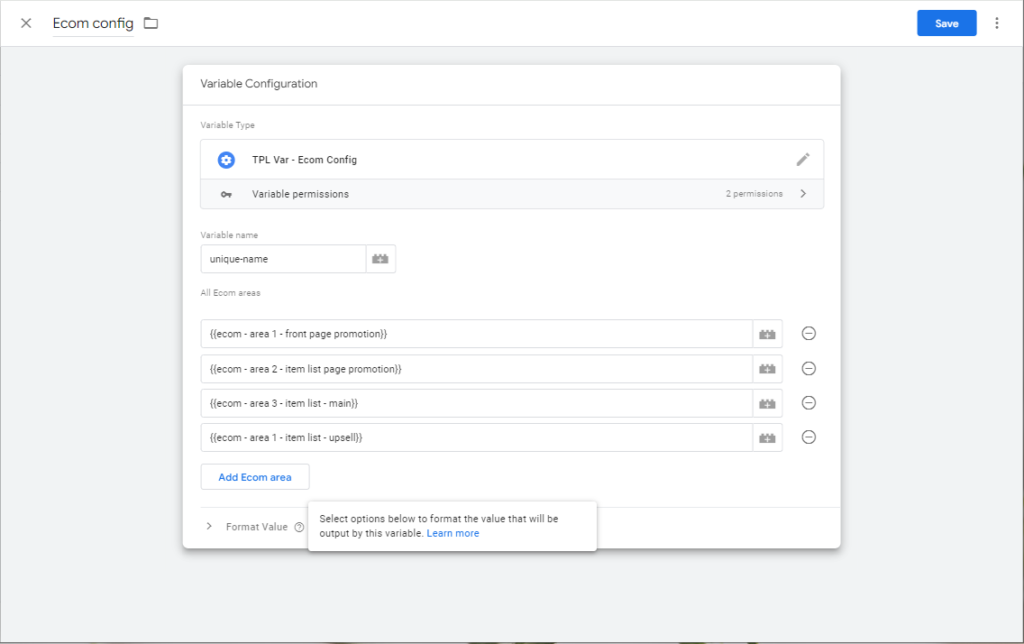
The topmost setting that became visible by selecting “Custom ecommerce configuration” is “Enhanced Ecommerce Module config variable”. This field expects an Ecom config variable which you can create form the custom varible template that we provide. This template collects settings for all ecom areas throughout your website. You simply need to add all ecom configurations to this variable. Details follow further down.
The variable first expects a variable name which only serves caching purposes. You need to make sure that this field contains a name that is unique within your container accross ecom config variables to ensure proper caching if you should have more than one. The name also needs to supported a value if you only have one Ecom config variable.
Listing ecom areas
Two types of ecom areas can be added through the Ecom config variable and the first one is an Ecom asset area. Ecom assets are ecom lists ( product lists ) and promotions or lists of promotions. These can generate view promotion, view item list, select promotion and select item events with optional whislist and cart actions.
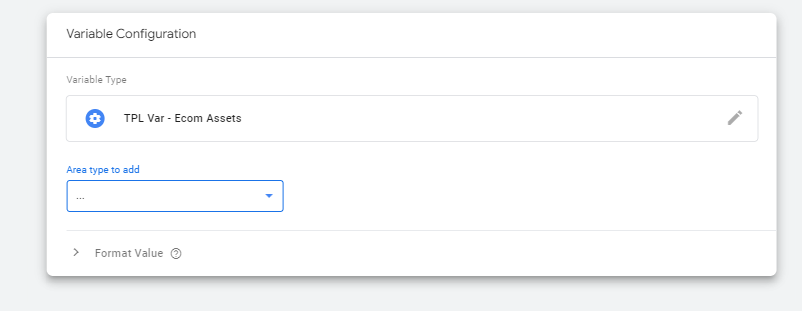
You can describe an Ecom asset area leveraging the Ecom asset variable that we provide. Whenever you finish describing the area you should add the ready Ecom asset variable to the Ecom config variable created in the previous section.
Ecom assets ( a product list or a promotion area )
Area type to add
The Ecom asset variable accepts a couple of options and the first one is “Area type to add” which you can select form a dropdown. You should select promotion for a promotion area or list for a product list. You can have as many product lists or promotions within a single page or throughout your website as you wish. There are no limitations here. If you have a regular product list and a cross-sell list on the same page, it is easy to distinguish with this setup.
One important improvement compared to regular setups is that product views are only being pushed as products are becoming visible, not on page load.
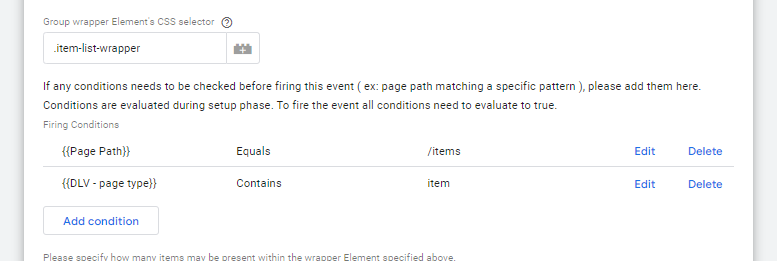
Group wrapper Element’s CSS selector
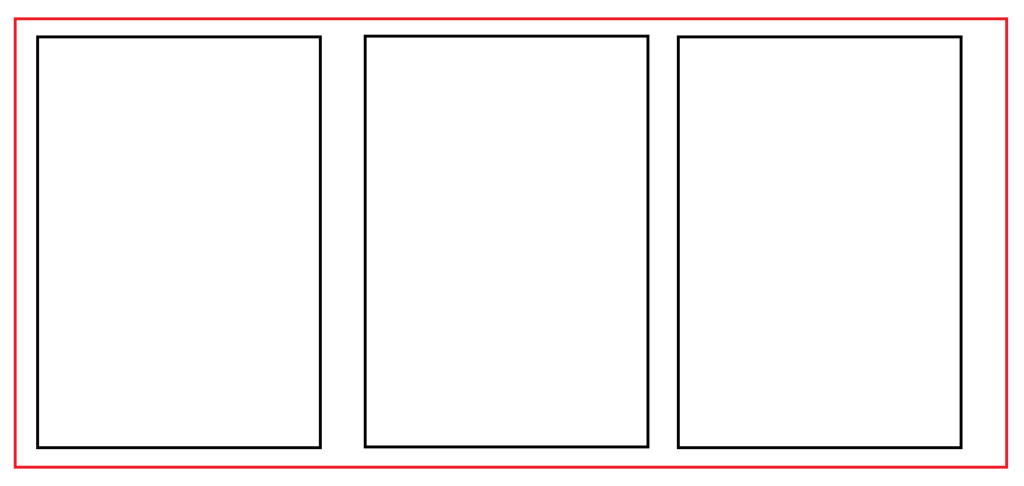
Lets take the example of setting up an item list for now. Once you have selected item list ( we will describe a product list area ) “Group wrapper Element’s CSS selector” option becomes visible. This field expects a CSS selector for the HTML element the wraps all products within this list as visualized below with the red line. The selector should be unique within a single page or if the selector selects multiple elements, then all matching elements’ contents will be tagged as product lists.
Firing conditions
Once you have specified the selector for the group ( product list or promotion items ) wrapper element, the next field that you can interact with is “Firing conditions”. You can add any number of conditions here that are all going to be checked to be true for the list tagging to be active on the page.
Probably one of the most common options to add here is the page path to be equal to a given value ( the list is only visible on a fixed url ) but you can also check for example that a dataLayer variable equals a given value, or a JS variable is present. A dataLayer variable in the case above, or any dynamic value this field takes has to be present when GTM loads up as these values are only evaluated on startup to leverage caching and preserve performance. All value changes for variables added into these condition lists are disregarded after the evaluation of the ClientConscious tag in GTM.
Adding firing conditions is extremely important if our CSS selector is rather generic, say “.wrapper”. If you do not specify a given page path as a firing condition here then all of your website’s pages will be checked for this selector and whenever one is found its contents will be tagged. You can restrict this behavior by adding some conditions like a page path or a page path pattern match.
Individual products or promotions
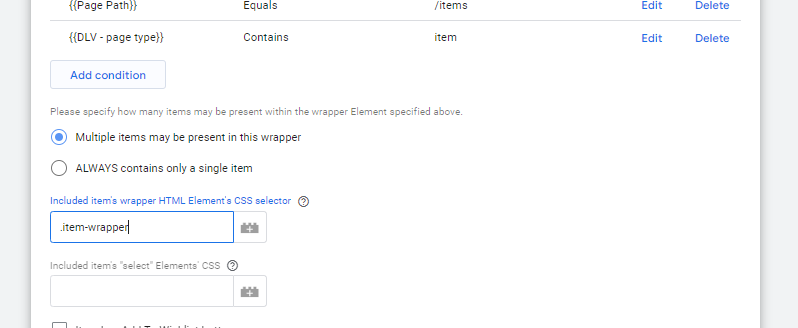
Once you have set all your firing conditions, you have to specify if the asset contains multiple items or a single item only by selecting from 2 radio options ( ususally the latter option is only happening for certain single promotion areas ).
Included item’s wrapper HTML Element’s CSS selector
If multiple items are present within the area you also have to specify the individulal items’ ( products’ or promotions’ ) wrapper HTML elements’ CSS selector within the “Included item’s wrapper HTML Element’s CSS selector” field. This selector has to be true for all products within the list ( like “.ecom-item” ) and will be evalauated relative to the list wrapper element, so you do not have to add “#list-wrapper .item-wapper” but only “.item-wapper”.
As mentioned before whenever an item wrapper becomes at least 50% visible a view item or a view promotion event will be tracked, but nothing on page load to keep these events real view events. This enables you to determine real click-through rates or discover products in your inventory that are rarely seen.
If you select that only a single item is present within the wrapper element, then “Included item’s wrapper HTML Element’s CSS selector” field will disappear and the view event for the single contained item will be triggered when the group wrapper element is 50% or more visible.
Select, cart and wishlist buttons
Once we are ready with specifying product markup boundaries we can move on to set where the action areas are within products. Clicks on these areas will trigger the add to cart, remove from cart, select item and select promotion events. All selectors are evaluated relative to the product and promotion item wrappers, so nor “#list-wrapper .item-wapper .select-wrapper” or “.item-wapper .select-wrapper” should be specified but “.select-wrapper” only.
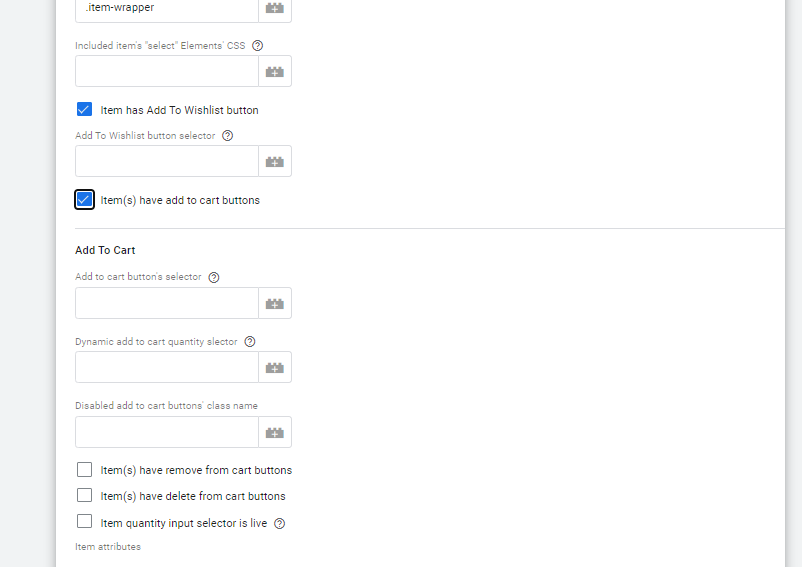
Included item’s “select” Elements’ CSS
The first field for such elements that you can fill in is “Included item’s “select” Elements’ CSS” which specifies the wrapper HTML element that will trigger select item and select promotion events when it receives a click. Even if the click happens on an embedded element ( like on an icon within a button ) the event will be triggered. If the complete product markup is clickable and will take you to the details page, then simply put a star symbol “*” here. This means that a click anywhere witihin the product will trigger the select event.
Item has Add To Wishlist button
If you check “Item has Add To Wishlist button” then Add To Wishlist button selector field becomes visible where you can specify the button wrapper HTML element’s CSS selector. A click on the button or any contained element will trigger the add to whislist event for a product similar to the select events.
Cart action tagging
You can check Item(s) have add to cart / remove from cart buttons which make underlying settings for related buttons become visible.
If you have elements that always display the actual in-cart quantity for the products then you do not have to add settings for cart action buttons. For instructions on what to do in such cases please refer to the next section.
Add to cart / remove from cart
Both options have a button selector field which is the place where you can specify the CSS selector for the outmost HTML element of the add to cart button ( usually a button element ). Just like in previous cases selectors are evaluated relative to item boundaries, so the selector you should be using is something like “.add-to-cart-button” not “.product .add-to-cart-button”.
Both options have a field to specify a dynamic quantity selector. You only need to set this field if you can add to cart / remove from cart quantities otherthan 1. This setting is useful where you have a plus sign to interact with quantity before you push the cart action button. Just like in previous cases selectors are evaluated relative to item boundaries.
Disabled class selector for both cart actions should contain the class that’s added to the respective button when the button becomes disabled ( ex. when the quantity is already 0 and you cannot remove any more items, thus remove from cart button becomes inactive and a click of the user should not trigger a new remove from cart event ). If the class is present on the button wrapper it will prevent the cart action event from being triggered.
Item(s) have delete from cart buttons
If you check “Item(s) have delete from cart buttons” you can specify two further settings. The selector of the button and the selector of the element which displays the in-cart quantity. Just like in previous cases selectors are evaluated relative to item boundaries. The push of the button will trigger a remove from cart event which will contain as quantity either the number displayed within the element specified by the quantity slector or the quantity that has been computed so far and that is stored in the basket cookie. Specifying the selector for the element containg the quantity can help to reduce discrepancies.
Item attributes
You can specify item properties by adding rows to this table – one property by one line. Each property can either be a CSS selector, a variable or a dataLayer variable.
Selector values
If the property is specified as a selector then the selector will be evaluated relative to the item wrapper and the property value will be the specified element’s text content. For example if you have h2 as a CSS selector for item_name then item_name will be the text content of the first h2 tag within the item markup.
Variable values
If you select variable from the dropdown for specifying the property then you can do two things: 1) you can provide a string in which case you hardcode the value for all products within the list. For example if you add “my list” as a variable value for item_list_name then item_list_name for all products will be “my list”. 2) you can provide a callback function which returns a function which will be called to return a value. This option can be useful if you want to compute a value on the fly when an action event for the product is happening. In this case value should be a custom Javascript function that returns a function that returns a value. You are free to choose what you put into the function, but the value returned will be the value of the given attribute for the product.
dataLayer variable values
If you select dataLayer variable, then you can add the path for a variable in the current dataLayer model that contains the value for the given attribute ( ex. eventModel.event_action ).
Item quantity
If you add quantity to this table of item attributes and you specify it by adding a CSS selector, and the item specified by the selector contains the actual in-cart quantity for the product, then you do not need to specify cart action button selectors individually, but you can simply check the “Item quantity input selector is live” box right above this table. Whenever the value within the element specified by the quantity selector changes it will trigger an add to cart or a remove from cart event with the amount of the most recent value update.
This is all you need to know to add ecom events for promotions and item lists. Now lets take a look at how to configure events that are happening after you begin viewing the product details’ page and proceeding through the checkout funnel.
Ecom events variable – adding markup for view item, view cart and checkout events
You can use the Ecom events varibale template that we provide to create markup for the following events: view item, view cart, begin checkout, add payment info, add shipping info and purchase.
The variable you create with this template acts just like the one we used to create promotion and product list markups: you have to specify where the products and their attributes are displayed on the page and then ClientConscious will take care of the rest and create events for products becoming visible and actions taking place following user interactions. Let’s take a look at the details and see the fields the Ecom events varibale offers.
Ecom event to specify
You can select the ecom area type by utilizing this dropdown. You simply have to select which event will occur once the conditions that we are goinig to add below are fulfilled.
Group wrapper Element’s CSS selector
Same as for the Ecom assets variable. You have to add the selector for the element that wraps the complete section and all products within.
Please specify how this event is triggered
You can select from multiple options here: – On page view: you should select this option if the event specified above should be fired right on page load ( ex on a view cart page ) – When wrapper element becomes visible: this should be selected if you only want the event to be fired whenever the wrapper element specified above becomes 10% or more visible. – When clicking on a page item: if you select this option, then the users click on a specific page element will actually trigger the event and push that into the dataLayer. Upon choosing this option you also have to add the desired trigger element’s selector into the field that becomes visible below the dropdown. – On a specific dataLayer event: If you add the name of a dataLayer event that should trigger the ecom event then the first occurance of that event will trigger the event you specify in this variable, but not the consecutive ones.
Firing conditions
Acts exactly the same as wiithin the Ecom assets template. Please refer to the description above.
Add to cart / remove from cart buttons
Acts exactly the same as wiithin the Ecom assets template. Please refer to the description above.
Wishlist buttons
Acts exactly the same as wiithin the Ecom assets template. Please refer to the description above.
Item attributes
Acts exactly the same as wiithin the Ecom assets template. Please refer to the description above.